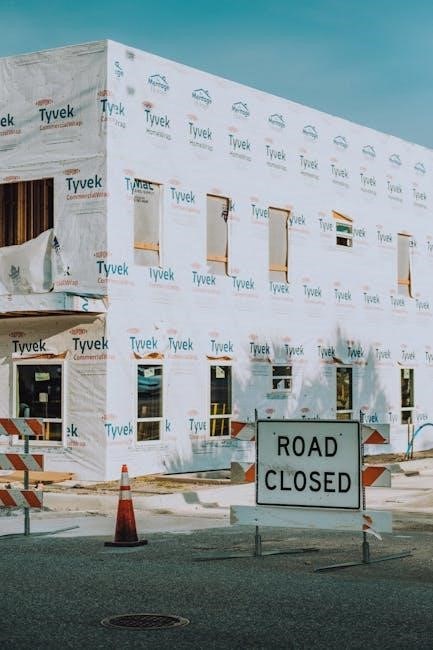
DuPont Tyvek is a high-performance water-resistive barrier essential for protecting buildings from weather elements and moisture. Proper installation ensures durability and effectiveness, making it a critical step in construction.
What is Tyvek?
DuPont Tyvek is a high-performance, durable material made from polyethylene fibers. It serves as a water-resistive barrier, protecting buildings from weather elements and moisture infiltration. Known for its lightweight, breathable, and tear-resistant properties, Tyvek is widely used in construction to enhance energy efficiency and prevent water damage. Its versatility makes it suitable for various applications, including walls, roofs, and windows, ensuring long-term structural integrity and protection.
Importance of Proper Tyvek Installation
Proper installation of DuPont Tyvek is crucial for creating a reliable water-resistive barrier. It prevents air leakage, reduces moisture infiltration, and ensures energy efficiency. Incorrect installation can lead to water damage, structural issues, and mold growth. Following the manufacturer’s guidelines ensures optimal performance, protecting the building envelope from weather elements and maintaining long-term durability and safety. Proper techniques are essential to maximize Tyvek’s benefits and prevent costly repairs.
Preparation for Tyvek Installation
Ensure the surface is clean, dry, and free of obstructions. Inspect for damage or uneven areas that may affect the Tyvek membrane’s performance and adhesion.
Tools and Materials Needed
Essential tools include a utility knife, staple gun, measuring tape, and ladder. Materials required are DuPont Tyvek rolls, DuPont Tyvek tape, and weather-resistant fasteners. Additional items like Tyvek FlexWrap and apron flashings may be needed for specific applications. Ensure all materials are compatible with Tyvek to maintain integrity and performance. Proper equipment ensures a smooth and effective installation process, adhering to manufacturer guidelines.
Surface Preparation and Inspection
Before installing Tyvek, ensure the surface is clean, dry, and free of debris or sharp objects. Inspect the sheathing for damage or irregularities, addressing any defects promptly. While no specific surface preparation is required for Tyvek WRBs, proper inspection ensures a smooth installation. Check for protruding nails or screws that could puncture the membrane. Repair any sheathing defects to ensure optimal performance and adhesion of the Tyvek barrier. Follow manufacturer guidelines for surface readiness.
General Tyvek Installation Steps
Start at the bottom for proper shingling, ensuring water sheds effectively. Unroll and align Tyvek membranes tightly, considering vertical or horizontal installation methods based on the structure.
Starting at the Bottom for Proper Shingling
Begin at the base of the structure to ensure proper shingling, which is critical for water resistance. This method prevents water infiltration and ensures the membrane’s durability. Align the Tyvek membrane tightly, applying it smoothly without wrinkles or air pockets. Starting low guarantees effective weather protection and maintains the building envelope’s integrity. Always follow DuPont’s guidelines for optimal installation.
Unrolling and Aligning Tyvek Membranes
Unroll the Tyvek membrane smoothly, ensuring it remains plumb and aligned with the structure. Start at a corner, extending the roll slightly past the edge for proper coverage. Stretch the material taut to eliminate wrinkles and air pockets, securing it with fasteners. Avoid over-tightening, as this can cause distortion. Proper alignment ensures seamless integration with other components, preventing water infiltration and ensuring a tight, weather-resistant seal throughout the installation process.
Vertical vs. Horizontal Installation Methods
Tyvek can be installed vertically or horizontally, depending on the structure. Vertical installation starts at the bottom, ensuring proper shingling and water shedding. Horizontal application is also effective but requires careful alignment to maintain weather-tight seals. Both methods demand precise unrolling and alignment to prevent wrinkles and ensure continuity. Vertical installation is generally preferred for optimal water resistance and durability in most construction projects.
Sealing Seams and Joints
Sealing seams and joints with DuPont Tyvek Tape ensures a weather-tight barrier, preventing water intrusion. Proper application is critical to maintain the integrity of the water-resistive barrier system.
Using DuPont Tyvek Tape for Sealing
DuPont Tyvek Tape is specifically designed for sealing seams and joints in Tyvek installations, ensuring a durable and weather-tight barrier. It adheres securely to the membrane, providing long-lasting protection against air and moisture infiltration.
Apply the tape to clean, dry surfaces, pressing firmly to ensure proper adhesion. It is ideal for sealing edges, overlaps, and penetrations, maintaining the integrity of the water-resistive barrier system.
Best Practices for Ensuring Tight Seals
Proper sealing techniques are critical for maintaining the integrity of the Tyvek barrier. Ensure all seams and joints are tightly sealed using DuPont Tyvek Tape, applying it firmly to clean, dry surfaces for optimal adhesion. Press the tape securely to prevent air and moisture infiltration. Regularly inspect and re-seal any gaps or weaknesses to maintain a weather-tight system. Following manufacturer guidelines ensures long-term performance and protection against environmental elements.
Flashing and Integration with Windows and Doors
Proper flashing ensures a weather-tight seal around windows and doors. Integrate Tyvek with flashings to maintain continuity, preventing water infiltration and ensuring long-term building envelope integrity.
Flashing Systems Installation Guidelines
Flashing systems must be installed to ensure a watertight seal around windows and doors. Start by integrating Tyvek with window and door flashings, ensuring proper shingling. Use DuPont-recommended flashing products like Tyvek FlexWrap and aprons. Apply the membrane under the apron for a secure seal. If windows are already installed, integrate Tyvek with existing flashings to maintain continuity. Follow manufacturer guidelines for detailed steps to ensure optimal performance and durability.
Integrating Tyvek with Window and Door Flashings
When installing Tyvek around windows and doors, ensure proper integration with flashings for a watertight seal. Apply Tyvek FlexWrap and aprons to direct water away from the structure. If windows are already installed, integrate the Tyvek membrane with existing flashings to maintain continuity. Follow DuPont guidelines for precise application, ensuring the barrier is sealed under the apron. This step is critical to prevent water infiltration and ensure long-term durability of the building envelope.
Tyvek Roofing Installation Guidelines
Install Tyvek under roofing materials to ensure a weather-tight seal. Ensure proper ventilation beneath roofing to prevent condensation. This ensures long-term durability and performance of the roofing system.
Installing Tyvek Under Roofing Materials
Start at the bottom of the structure to ensure proper shingling of Tyvek under roofing materials. Unroll and align the membrane smoothly, securing it with recommended fasteners. Ensure a tight seal to prevent water infiltration. Proper ventilation under the roofing is crucial to avoid condensation, ensuring the membrane remains effective. Follow manufacturer guidelines for installation to maintain durability and weather resistance.
Ensuring Proper Ventilation Under Roofing
Proper ventilation under roofing materials is critical to prevent condensation and moisture buildup. Ensure the space beneath the roof sheathing is well-ventilated before installing Tyvek. For optimal performance, maintain a clear air space of at least 1 inch between the membrane and insulation. This promotes airflow and helps prevent moisture accumulation, ensuring long-term durability and weather resistance. Always follow manufacturer guidelines for ventilation requirements during installation.
Specialized Tyvek Products Installation
DuPont offers specialized Tyvek products like ThermaWrap LE and DrainWrap, each with unique installation requirements. These products enhance thermal performance and moisture management in specific applications, ensuring optimal results.
Installing DuPont Tyvek ThermaWrap LE
DuPont Tyvek ThermaWrap LE is designed to enhance thermal performance and moisture protection. It must be installed with the shiny, metallic side facing outward to reflect heat. A minimum 1-inch air space is required to achieve the advertised R-value benefits. This product also functions as a water-resistive barrier, even without the air space. Proper alignment and fastening ensure optimal performance and durability in various building applications.
Specific Requirements for Tyvek DrainWrap
DuPont Tyvek DrainWrap is designed for vertical applications, requiring drainage grooves to be oriented vertically for proper water management. It must be installed with the grooved side facing outward to ensure water runs freely. Unlike other Tyvek products, no surface preparation is needed for installation. The product must be aligned correctly to maintain its drainage functionality and integrated with compatible flashing systems to ensure a watertight seal and optimal performance in exterior wall systems.
Integration with Other Building Materials
DuPont Tyvek seamlessly integrates with materials like vinyl siding, stucco, and EIFS, ensuring compatibility and optimal weather protection. Proper installation enhances the building envelope’s performance and durability.
Using Tyvek with Vinyl Siding
When installing Tyvek with vinyl siding, ensure proper shingling by starting at the bottom. Align the membrane with the siding, maintaining a watertight seal. The printed logo should face outward for visibility. Follow manufacturer guidelines for compatibility and installation. This ensures the barrier performs effectively, preventing moisture infiltration and enhancing the building’s durability. Proper integration is crucial for a long-lasting, weather-resistant exterior envelope.
Tyvek Installation with Stucco and EIFS
When installing Tyvek with stucco or EIFS, ensure proper shingling by starting at the bottom. Align the membrane with the structure, integrating it with flashing systems for windows and doors. Use Tyvek tape to seal seams and ensure a watertight barrier. StuccoWrap and DrainWrap must be installed with drainage grooves vertical. Proper installation prevents water infiltration and ensures compatibility with exterior finishes, maintaining structural integrity and durability.
Mechanical Fastening and Temporary Methods
Use DuPont Tyvek Wrap Cap Staples with a 1.0-inch minimum crown for mechanical fastening. Temporary methods are recommended for non-nail-based sheathings to ensure secure installation without compromising the membrane.
Recommended Fasteners for Tyvek
Use DuPont Tyvek Wrap Cap Staples with a 1.0-inch minimum crown for secure fastening. These staples are designed to prevent tearing and ensure a tight seal. For non-nail-based sheathings, alternative fastening methods may be required. Always avoid staples with a crown less than 1.0 inches, as they may not hold properly. Follow DuPont’s guidelines to maintain the integrity of the Tyvek membrane and ensure compliance with installation standards.
Temporary Fastening Methods for Non-Nail-Based Sheathing
For non-nail-based sheathing, such as foam, use temporary fastening methods like DuPont Tyvek Wrap Cap Staples with a 1.0-inch minimum crown. These staples prevent tearing and ensure a secure hold. Temporary methods are necessary when standard nails cannot be used. Refer to the guide for detailed instructions on alternative fastening schedules and requirements to maintain the integrity of the Tyvek membrane and ensure proper installation on non-traditional surfaces.
Local Building Codes and Compliance
Ensure compliance with local building codes and industry standards like ASTM D4756-06. Verify jurisdictional requirements and Tyvek specifications to meet regulatory and safety standards effectively.
Checking Jurisdictional Requirements
Verify local building codes and standards for Tyvek installation. Ensure compliance with ASTM D4756-06 and other relevant standards. Requirements may vary by location, so consult local authorities. Confirm that Tyvek products meet jurisdictional specifications for water-resistive barriers. Adhere to DuPont’s installation guidelines to avoid non-compliance issues. Proper documentation and inspections may be necessary to satisfy local regulations. Always check for updates to ensure adherence to the latest codes and standards.
Ensuring Compliance with Industry Standards
Adhere to industry standards like ASTM D4756-06 for vinyl siding and ASTM D4869/D4869M for air infiltration. DuPont Tyvek must meet these specifications for water-resistive barriers. Use approved materials, such as DuPont Tyvek Tape, for sealing seams. Follow manufacturer guidelines for installation methods and material compatibility. Ensure compliance with testing requirements for air and water resistance. Refer to DuPont’s official resources for detailed standards and updates to maintain conformity with industry practices and certifications.
Troubleshooting and Best Practices
Address common mistakes like improper shingling or inadequate sealing. Regularly inspect Tyvek for damage or gaps. Follow manufacturer guidelines for repairs and maintenance to ensure long-term performance.
Common Mistakes to Avoid During Installation
Common errors include improper shingling, which can lead to water penetration, and incorrect alignment of Tyvek sheets, causing gaps. Ensure surfaces are clean and dry before installation. Avoid using incompatible fasteners, as they may damage the membrane. Improper sealing of seams with DuPont Tyvek Tape can compromise the water-resistive barrier. Always follow manufacturer guidelines for temperature and weather conditions during installation to prevent wrinkles and tears. Regular inspections can help catch and fix issues early.
Maintenance and Inspection Tips
Regularly inspect Tyvek membranes for tears, punctures, or loose seams. Ensure proper ventilation to prevent condensation buildup. Clean the surface of debris and dirt to maintain integrity. Inspect flashings around windows and doors for tight seals. Check for any signs of weathering or degradation, especially in exposed areas. Schedule annual inspections to address issues early and extend the lifespan of the barrier. Always follow manufacturer guidelines for repairs and maintenance.